The Two-Hour Igloo: Five Steps
 By Burton Olsen, Kirk Monson and John Bennion
(Published Dec. 2001, Utah Outdoors magazine)
Moonlight bathes the snow as we snowshoe up through the aspens in the mountains above Huntington. The night is still and cold, nearly zero. We crest a ridge at about 9000 feet. Below us squat eight igloo-shaped mounds, our homes for the night. Sliding down the hillside, we see light coming from the low doorways of our snow caves. A pot of water boils just outside the door. We crowd inside the largest cave, where six sleeping bags are laid out on shelves around the walls. Sitting on the beds, we eat hot stew and sip hot drinks. Inside it’s 30 degrees, comfortable for sleeping during the winter. By morning, the air outside will drop to 10 degrees below zero — a difference of 40 degrees.
 Every winter, cross-country skiers and snowshoe hikers pack their cars and head out of town to enjoy the beauty and serenity of a night or two in the wilderness. They can rent a lodge, camp in a yurt, or pitch a tent. But for people who want to escape civilization, lodges are unsatisfactory, crowded with people and technology. Yurts are unavailable in some pristine areas. Tents are not insulated; preparing food, resting, and sleeping in one can be a bitter experience.
As a natural and adventurous alternative, some backpackers build snow caves to use as a base for day trips. A properly built snow cave is not difficult to construct, and a foot or two of packed snow offers more protection from very cold weather, winter storms, or high winds than a tent. However, many who have tried to build such a shelter have had a miserable experience, enduring soaked sleeping bags, frozen toes, and cramped quarters. Many give up, pack up in the bitter-cold night and march back to their vehicles, vowing never to leave the warmth of their houses until summer.
During his 20 years of building snow caves with students as a recreation management professor at Brigham Young University, Burton Olsen has seen every condition: crystallized snow — as unstable as ball bearings — powdery snow, and shallow snow. He has developed a five-step method by which a whole class of first-time winter campers can build solid, safe snow caves, large enough to include sleeping shelves. The five steps are:
- Select a site.
- Make a strong foundation.
- Build a large mound and pack it down.
- Excavate the interior.
- Provide the finishing touches.
Select a site
Earlier in the afternoon, before our moonlit jaunt, we set out with a group of 20 students to spend a night near Cleveland Reservoir. We could see from the cut made by the plow on the highway that the snow was nearly six feet deep. It's possible to build caves with only six inches of snow, but the work required to gather a heap of building material makes the trip less pleasant than when the snow is deep. Most of the high mountain areas in Utah will have plenty of snow.
To select our spot, we began by looking for a flat area, free of trees and brush. We stayed away from areas with potential avalanche danger, places subject to high winds, or spots under tall trees with dead branches which, weighted down by snow, could fall on us during the night.
The students spread out across the crown of the ridge and poked ski poles or long pine branches into the five-foot-deep snow to check for boulders or underbrush. No one wanted to spend half of the late afternoon building a snow cave only to discover a fallen tree or Forest Service sign in the middle of his or her bed.
Make a strong foundation
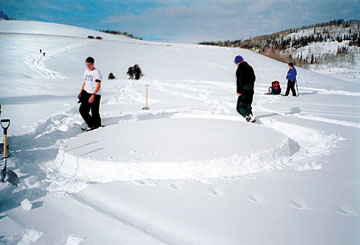
Once each group of three to five students selected a spot, they traced a circle in the snow for the walls. Our team of three made a circle about 12 feet in diameter. We prepared a foundation by stomping around the circle in snowshoes for about ten minutes. Without this preparation, walls could collapse when team members scoop out the interior.
Build the mound
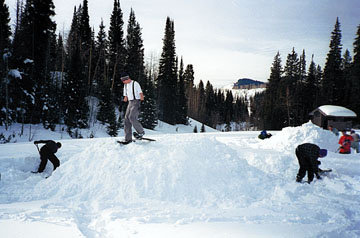
Our goal was to make a mound of snow about six feet high. First, we shoveled snow into the center from the outside of our circular foundation. We used large aluminum scoop shovels, which are ideal for moving a mass of snow. The time saved building our cave was well worth the slight effort of carrying these shovels to our site. (In an emergency, a snowshoe can be used instead of a shovel.) To help pack the snow and shape the outer surface of our cave, one of our group periodically climbed on top and stomped in a circular pattern with his snowshoes. We also used our shovels to tamp and smooth the sides of our structure. When we had acquired the proper height and shape, a six-foot tall, sloped dome, we worked even harder to pack the sides and top with our shovels.
If the snow had been very dry, we would have waited between half an hour to an hour for it to settle and melt slightly, but on this occasion the snow was wet and heavy and we didn't need to wait to start our excavation.
Excavate the interior
With a tightly packed dome, we were ready to dig out the interior. We positioned the entrance toward the downhill side of our cave. We knew from experience that having the entrance at the lowest point would help trap warm air inside. The direction of the wind was another factor to consider: a downwind door means warmer sleep. We made the entrance about a two and a half foot diameter, small enough that our backpacks could cover it to hold heat inside, but large enough that we could enter and exit without difficulty. We dug toward the center of the cave for about three feet, doming the ceiling as we went. A small backpacking shovel is handy for the first part of the digging because of the cramped quarters.
We worked together. One person dug out the interior, another cleared the snow from outside the opening, and the third measured the thickness of the walls. To keep from digging right through the walls and collapsing our cave, we measured with a ski pole. (A long, straight stick would have worked just as well.) First, we measured the ceiling. One of us crawled part way up the side and poked a ski pole into the crown of the cave. He then worked the pole up and down while the person inside dug toward the sound of the moving stick. He could hear the stick rubbing against the snow, even though he would have been deaf to a 50-piece band playing just outside the wall, let alone any shouted message. When the digger reached the end of the stick, he pulled on it, a signal to the person on the outside, who then set the stick at the proper depth-eight to twelve inches for the ceiling. The digger then cleaned out the excessive snow, doming the cave to the proper thickness at the top. Without using this method, trying to estimate the thickness of the walls would be frustrating.
Next we measured the two side walls. Our outside person walked a quarter of the way around the cave from the opening and pushed his pole into the wall half way up from the bottom of the structure. We used the same procedure to measure the thickness of the side walls; the outside man moved the stick inside the wall, then withdrew it to the right width, which is two feet at the base, narrowing to one foot toward the top. We took the third measurement on the opposite side, directly across from the side hole. By now the inside cave was big enough that two people could crowd inside to shovel snow out. Our third person continually shoveled excess snow away from the entrance. Finally, we measured and dug out the back wall.
As we fashioned the interior, we left a bench around the sides and back of the cave, about a foot and a half from the floor. Because cold air stays in the lower part of the finished snow cave, these benches insured a warmer cave.
We have learned the hard way that the inside of a snow cave must be continually domed throughout the excavating process. A common mistake made by beginners is to dig straight in, and the excessive weight of the snow above will collapse the cave. Because of this danger, one of us always stayed outside during the digging process. If the cave collapsed, that person could help anyone trapped by the heavy snow.
Provide the finishing touches
Once the walls and ceilings had the proper dimensions and the sleeping benches were roughed out, we were ready to put the finishing touches on our domicile. At this stage, the inside architects refined the sleeping and sitting bench, which extended around three sides of the cave. Our bench was about three feet wide. We packed the snow, making the surface smooth, because body heat ices the bench and every little bump feels like a rock in the back. This is especially important at two in the morning, when the last thing any unhappy camper wants to do is unzip his or her sleeping bag to chip away an ice bump. After the bench was finished, we took a snowshoe — although a backpackers' shovel would also do — and scraped the entire ceiling to make the inside very smooth. Otherwise, it would have dripped water during the night.
After scraping the ceiling, we glazed the inside of the cave by putting a heat source in the middle of the cave. Glazing made our cave stronger and provided better insulation. It also prevented snow from flaking from the ceiling and going down our necks, into our sleeping bags, or in our soup. We accomplished the glazing by using a backpack stove to heat water for our dinner, but one or two large candles in the bottom center burning for about 20 minutes would have done the job just as well.
While we glazed the cave, we brought in our gear and got into dry clothing. This is essential. Even though the outside builders weren't as wet from direct contact with the snow, sweat had built up inside their clothing. Wet clothing and slight dehydration is a formula for hypothermia. We had a hot drink to help us stay hydrated and increase body temperature.
We then laid out our bedding. Each of us spread a ground cloth, a full-length insulated camping mattress, and a sleeping bag rated to zero degrees Fahrenheit. Sitting on our sleeping shelves, we felt snug and happy inside our lodge in the wilderness.
Throughout the evening, we monitored the temperature of the cave by examining the ceiling. If it started to drip, we knew the inside was getting too warm. It's safest to cook outside of the cave, because of the danger from asphyxiation or carbon monoxide poisoning. However, if the weather is very cold, windy, or stormy, snow cave campers can cook inside with a backpack stove in good working order. We provided ventilation for the stove by widening the holes made to measure the thickness of the walls. We placed our stove near one of the holes, and the fumes of the stove were quickly drawn outside.
After dinner, we emerged into the moonlit landscape and went for a night hike, confident that if we became cold we could return to the warmth of our caves. When we finally returned and go to bed, we extinguished the stove and candles, and then stuck snowballs in the ventilation holes and arranged the backpacks across the entrance to hold as much heat as possible inside the cave.
In the morning, everyone emerged from their caves like moles from their burrows, after a relatively warm and comfortable night. After a hearty breakfast in the morning sun, we took photos of each cave, with the inhabitants standing on each dome — proof that snow caves are stronger than they look.