 By Ed Qulnlan
Utah Outdoors, Sept, 2002
N SEPTEMBER and October, when hunters and other outdoor enthusiasts take to the field, you can never be sure exactly what to expect. A good trip can easily turn frustrating due to unexpected weather, difficult terrain or uncooperative game animals. One thing that doesn't have to suffer are the meals. Who knows, you might even forget about the day’s challenges as you sink your teeth into a hot chunk of roast and potatoes.
Traditionally, the campsite has been the center for all outdoor lore—a group of tired bodies gather around a makeshift fire, reclined in folding lawn chairs and talking up the day’s events over a plate of great grub. Camp cooking can be fast, easy and healthy; just follow these simple guidelines.
Remember, a little planning goes a long way Before leaving on your trip, create a menu with ideas from everyone in your Camp. Make a list that consists of a variety of food options. Think of your favorite home meals and then plan to recreate them at the campsite.
Don’t be afraid to try new dishes, I like to grab a cookbook and pick out some basic ideas. If you’ll be gone several days, try the same general dish twice, adding a new twist. For instance, 1 really can’t get sick of meat and potatoes. So, how about last year’s venison one night and chicken the next. There rarely seem to be leftovers, so plan accordingly.
Be sure to pay attention to any special needs of campers in your group. Ask anybody if they have requests you can easily plan around. A diabetic or someone with heart concerns may require slight modifications.
 Health and nutrition are essential for any active excursion. You need your energy. Unfortunately, chips and soda won't put you at your best for the day. Plan a light and healthy breakfast and don't overeat. Take a few less strips of bacon and add a banana or orange It's hard to be an effective marksman if you're always grabbing your belly or panting to keep up.
Lunch should be simple and easy, Hot sandwiches are fast and easy to prepare. Toss some fruit down your hatch to keep your body fresh all afternoon.
A tasty dinner will add fuel to your body while replenishing you after a tough day, Avoid too many starches and heavy foods. Fresh veggies are an excellent snack alternative to potato chips. Try some tasty breakfast nachos for a quick and filling treat, Take along fresh fruit and leave the bags of cookies in the home cupboard.
Don’t forget to drink a lot of liquid, preferably water. First thing in the morning, I recommend downing a big glass of water to fill your body's water level, You should be stable by the time you leave camp after breakfast, Take along some extra water for the day’s trip and sip as needed.
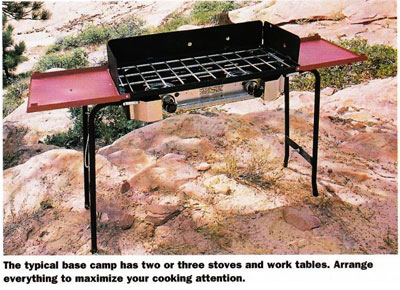
The location of your kitchen is key. Because the campsite tends to center around food, arrange your stoves and cooking gear near the hub of activity. You’ll be able to chat with everyone while you cook - and, who knows, they might even volunteer to help out. Pay attention to wind direction. You will want to keep from smoking everyone out while grilling up the bratwurst. Be sure to avoid flammable materials and potential hazards. The kitchen should not be setup directly next to tents, which might catch fire, or in direct camp traffic areas because you'll be using knives and hot cookware. Keep the kitchen movement as calm and simple as possible.
The typical base camp has two or three stoves and work tables. Arrange everything to maximize your cooking attention. For instance, I like to create a U-shaped setup that lets me step from one stove to another with ease. Make it easy to dish up the plates once the meal is done. Create a feeding line that begins at one end of the table with the plates and finishes up with the hot foods at the end. When possible, serve onto fellow campers' plates directly from the cooking pots.
While you can't plan for unexpected weather, you can he prepared for some basic surprises from Mother Nature. Take along an open-sided cooking shade to keep you dry during rain and out of the sun on hot days.
Because you are a guest in nature’s habitat, you will bring with you all kinds at new oddities. The smells created by cooking food are sure to gain the attention of area wildlife. Be sure to seal all food and garbage tightly. Then, place the items in a secure location; maybe in the RV rather than in a tent. From raccoons to bears, a good smelling meal can create a lot of problems for campers.
In addition, I recommend changing your clothes after cooking up the morning grub. You don’t want the smell of pancakes and bacon to give you away to the keen noses of the game you are trying to pursue.
Currently, most everywhere is under strict fire restrictions. Open wood flames and charcoal are off limits due to potential fire hazards. The only cooking options are propane stoves. Fortunately, the market has several new propane stoves and accessories that allow you complete cooking versatility. After cooking each meal, be sure to extinguish the flame from the stove and turn off the propane tank.
Propane stoves come in all sizes and shapes My recommendation is the Camp Chef two-burner stove. This unit was designed for outfitters and caterers – with attention to portability and power. With 60,000 total BTU/hr of power, this stove offers more than three times the cooking ability of the common camp stove. The professional-style stove features folding legs and shelves and a massive 448-square-inch cooking surface.
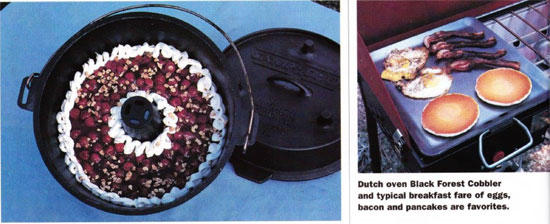
No camp cook is prepared without a slew of Dutch ovens. The Ultimate Dutch Oven features a convection cone, allowing the cast iron pot to cook speedily on your propane burner. You'll prepare dishes that are “yum, yum” in less than half the time of traditional methods. Besides, Dutch ovens are known for their ability to seal in a food's natural nutrition. Who cold turn down a delicious roast dinner cooked in healthy cast iron?
Add to your stove a steel griddle or cast iron skillet. From omelets to hush puppies, you'll whip up some shockingly tasty treats with this kitchen staple.
To those who awkwardly strap their grills in the back of the truck and haul them up the canyon, I holler, “No! Don't do it!” The Camp Chef barbecue grill box accessory covers one burner – take along two for large groups – and converts the camp stove into a restaurant-quality grill. From steaks to kabobs, I prefer the taste of cooking with this cast iron system.
Pots are available in all types of sizes to fit your menu and group size. A large capacity pot (such as Camp Chef's 40-quart stainless steel model) is excellent for corn on the cob. The 10-quart aluminum model is great for frying fish or boiling potatoes for a smaller crowd.
Add a patio cover and storage bags for your equipment, helping you protect the investment.
Finish off the kitchen with a wooden storage box. Custom-designed boxes, such as the options available from expert Dutch oven chef Kent Mayberry are a great way to organize your tools.
Select a camp cooler that fits your terrain needs. Newer models feature such amenities as tires and advanced handles Select models that allow you to segment your foods easily, keeping the meats away from other foods. Propane or RV refrigerators are an excellent way to keep your meat cold for long trips.
Begin your kitchen small and add to your equipment as your cooking ability advances with a wide variety of options on the market, you can expect to spend anywhere from $500 to $800 for a quality gourmet camp kitchen. In a world where every minor advantage can make a significant difference in performance, having the proper equipment to help you fuel your mind and body is key.
The campsite meals always seem to be the best meals of the year. Be prepared for a successful trip - and build your camp kitchen as a key ingredient. The market offers a variety of high tech outdoor cooking supplies. Over time, you can work to create the ultimate outdoor kitchen.
Outdoor kitchen care tips
1. Set up camp during daylight 2 Assign cooking and cleanup duty before the trip 3. Plan meals full of nutrition to give you maximum energy 4. Keep coolers and food supplies secure from animals 5. A clean camp is a safe camp 6. Seal garbage and foods from smells
Resources on the web
- www.campchef.com - Camp Chef outdoor cooking gear
- www.thesportingchef.com - wild game recipes and cooking information
- www.outdoorcooking.com - outdoor cooking newsletters, recipes and online shopping
- www.IDOS.org - International Dutch Oven Society
- www.outdoorchef.com - check your local weather forecast before you leave
Recipes
Ultimate Breakfast Nachos
By Ed Quinlan
- - 8 eggs
- - 1 lb. ground pork sausage
- - 12 strips bacon
- - 1/2 onion, chopped
- - 3 fresh mushrooms, sliced
- - 1 lb cheese, shredded (use more or less depending on preference)
- - 1 bag tortilla chips
Using the lid of the Ultimate Dutch Oven, scramble eggs on medium/low heat. Set eggs aside. increase heat to medium, brown pork sausage and cook bacon strips. Break bacon strips into small chunks. Discard remaining grease from meat.
In Dutch oven base, build layers of tortilla chips, egg, sausage chunks, bacon bits, chopped onion, mushrooms and cheese, Place over medium heat on stove. Cook for approximately 5 minutes or until cheese is melted. Serve and eat.
Tips: Add your favorite nacho flavors: peppers, green onions or olives. Dip your nachos into your favorite salsa for a great morning flavor burst.
Honey-mustard Ribs
By Marla Rawlings, author of the “Outdoor Cooking Guide"
- - 3 to 4 lbs beef or pork ribs
- - 2 tbsp. dried onion
- - 4 tbsp. Dijon mustard
- - 4 tbsp. honey
- - 1/2 tsp. liquid smoke
- - 2 tsp. brown sugar
- - 3/4 cup butter or margarine
- - 2 cloves minced garlic
Mix everything but ribs in a saucepan and simmer for 2 minutes. Cook ribs on the barbecue grill box over medium heat. Turn and baste with sauce often. Cook for 25 to 35 minutes until done.
Variation: This can also be prepared in a Dutch oven. Brown meat and pour sauce over ribs. Cover and simmer on low to medium heat until ribs are tender.
Black Forest Cobbler
By Gerry & Chauna Duffin, authors of “Dutch Oven Resource”
- - 29-ounce can cherry pie filling
- - 1 Devil's food cake mix
- - 12 to 16 ounces cream soda or lemon-lime soda
In a large bowl, empty contents of cake mix. Pour soda into a cake mix a little at a time, stirring after each addition until it reaches cake batter consistency. Lightly spray Dutch oven with nonstick oil. Empty pie filling into oven. Distribute evenly with a spatula.
Gently pour batter over pie filling. Spread evenly. Bake on medium/low heat for 30/35 minutes. Cool. Spread whipped topping over surface and serve.
Serves 12-15